What is the dbt YAML file?
The YAML standard is a serialised language which is highly effective for storing configuration profiles, perfect for what we’re doing here!
We won’t go over the YAML standard here but there are plenty of resources online if you’re starting from scratch.
Also - the YAML files we’ll be using are mostly pre-built for you when you install the dbt package to your environment and just require some light amendments to fit your project.
The key notation we’ll be using is:
Key: Value
Key:
nested value
- also a nested value, but use hypens or no hypens consistently
If you want to see how this fits into the bigger picture of deploying a dbt project, from scratch, we are just about to release our own public training course where we’ll help you through the set-up of your first dbt project!
Configuring your dbt YAML file: the basics
We’re assuming here you’ve got a dbt project set up already and have associated pre-requisites:
- an environment with dbt installed
- a source/destination data warehouse (DWH) with data in it.
- A profiles.yml file - this is usually set up in the top level of your user folder within the .dbt folder
- Your dbt_project.yml file - the real star of the show here. This is where we’re going to specify your environments and lay out your project config
- Your GIT repo of choice is configured to save our changes!
A look at profiles
Incredibly well named, your profiles.yml file is just that - a yaml file specifying the profiles you’ll use to connect to your data. Stored in your .dbt folder for security purposes - you don’t want this file deployed with your git pushes as it can contain sensitive information about your deployment such as login credentials.
The basic structure of your profiles file is as follows:
- your_profile_name:
- target: your_target
- outputs:
- Your_output_name_1:
- this is where your configuration details go for the output 1
- Your_output_name_2:
- this is where your configuration details go for the output 2
- Your_output_name_1:
A quick walkthrough of what you’re looking at here:
- Profile name is an identifier that groups your configurations for a particular datasource
- Target refers to the default target output that dbt will utilise in your dbt runs, for instance dev or prod. A suggestion here would be to set your default target to dev - that way you won’t be pushing anything to production unless you specify it explicitly by using the “- - target” - for example “dbt run - - target prod”
- Outputs - where your_output_name is listed, you can specify the identifier for a particular configuration.
- Under outputs (list item i) is where you detail the configuration details for the datasource you’re using. Dbt is multi-platform so has a heap of configuration details you can put here. The layout above is generic - here are some more specific connectivity details required for Snowflake, Postgres or BigQuery. Or you can check out the dbt documentation for your required platform.
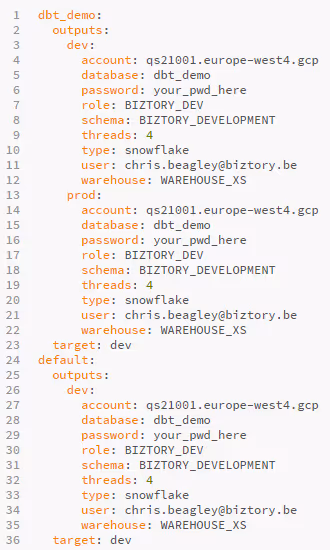
Below is an example of what a typical snowflake profile might look like:
Now you’ve got your datasource configuration - you can set up your project.
Then, for the dbt_project YAML file. The dbt_project.yml tells dbt key information about the way you’ve structured your project and where to find the resources you’re going to be referring back to but we have some additional configuariton we can do here for specifying/overiding dbt default run settings.
We’ll take a brief look at some of those too.
A basic dbt_project might look something like this:
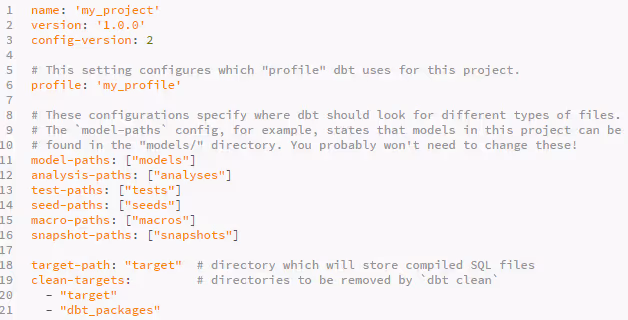
As we mentioned before, it’s mostly pre-built for you when you initialise your dbt project. The key things we’re going to want to change here, assuming you work with the default project structure are:
- Change the name to your dbt project name
- Select the relevant profile relating back to the configurations you set up on your profiles.yml
- You can change the target path here if you’d like your compiled files to be stored elsewhere. But for a typical use-case, this is likely not going to be necessary.
That’s it, that’s our basic set-up done - easy as that. But dbt also ships with a heap of optional extras that we can plug into our dbt_project if we want to. Other things we might want to include in our project might be tests, materialisation types or overriding datatypes that dbt is parsing.
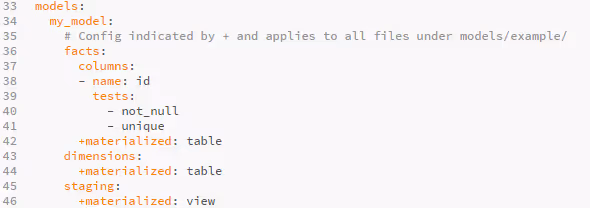
In the above example, we’re using some out-of-the-box dbt testing to ensure that our primary key is always populated and unique.
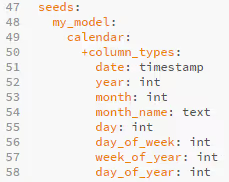
In the below example we’re overriding the data types for our seed that dbt is ingesting to ensure they’re being parsed correctly.
Or the optional quoting which is handy for when your queries fail because you may be using identifiers that match reserved words etc.
Note that for Snowflake this is false by default.

One final top tip to notice and remember when using the dbt YAML files is the use of the + notation. The plus prefix is used to disambiguate resource paths and configs.
Consider the following dastardly example where my wicked colleague (who evidently just wants to see the world burn) is using tags as a resource path and configuring the tabs configuration item. In this case, the use of + denotes a configuration item (since dbt v0.17.0).