Introduction to write-back in Tableau Prep
For over a year now, we’ve been blessed with one of Tableau Prep’s most powerful new features: the ability to write back to databases. Write-back was a heavily anticipated functionality that enables analysts who use Prep to pick up their data, perform Prep’s trademark user-friendly transformations and enrichment and finally write it back to a database table for the next step in the pipeline.
That approach covers specific use cases such as cleaning data with Prep, then writing it back to the database so it can be picked up by a specialized process for e.g. machine learning or other data science applications.
Aside from that, it can also be used for simpler, no-code data transfers between e.g. a Google Sheet and a database. If you think about it, that last example can be built without a single line of code and with just two Prep steps!
Incremental Updates: A Decent Start
Even before that, Tableau Prep did already support incremental refreshes of its Flows’ data.
The combination of incremental refresh with the ability to write back to a database is effectively a very powerful combo, that enables a versatile approach allowing you to pick the most optimal approach for identifying new data and inserting that into your destination table. The following scenario is thus effectively covered:
With the initial transfer, data gets transferred from the source to the target table, with write-back. All existing data is copied and put in place.

With each subsequent run, Prep is able to detect which rows are new, and thus to only append (i.e. effectively INSERT) the new rows. It does so based on the fact that we indicated that the Timestamp column is the key it should use to identify new data.
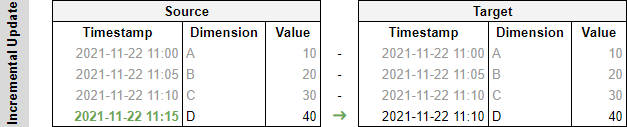
As illustrated above, existing rows are thus left alone (in gray) and we’re looking at a much more efficient way of inserting new data as opposed to simply clearing the table and reinserting all rows.
“Edge” Case: Rows Can Be Modified
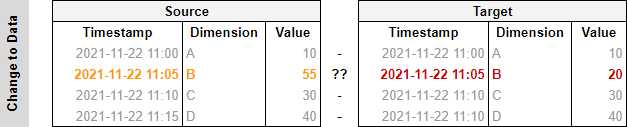
There is however, a scenario where the above might not suffice. It’s a case that applies in many different settings and businesses, which is when existing data might be modified.
In other words, what happens when a row we’d already added before, needs to be updated? In the example below, the value of the existing row has changed.
This is not uncommon. We here at Biztory have just stumbled upon this when working on a Prep Flow to export all of our Slack messages into a database for further analysis.
That in itself is a longer story, but let’s first understand why this can pose a problem. In our case, the fact is that messages can be modified after they were initially posted. If the Prep data update takes place before the last edit of a message, we won't be able to save the latest version of the message to the database.
Perhaps the first thing you would think is: “Why do we not simply update the Timestamp of rows that have been modified?” That is definitely an idea, but there are limitations to fiddling with the Timestamp:
- If you don’t modify the timestamp, the row will not be detected by Prep’s incremental functionality. That is the status quo.
- If you do modify the timestamp, it will be inserted as a new row, causing duplication. Depending on the case, it is probably no longer possible to uniquely identify rows which are actual and which are out-of-date.
- In some cases, we may not actually be in control of how the data is input and whether the Timestamp value is updated.
Instead of trying to come up with a creative solution by manipulating the Timestamp column, let’s take a step back. This complication is not specific to Tableau Prep.
In fact, as one might expect, this is a predicament that applies to any database. And as such, it is effectively implemented in many database systems in an efficient manner, that we can utilize here.
UPSERT or MERGE data with Tableau Prep
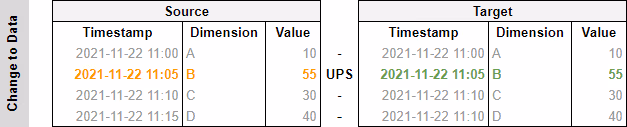
Before anything, let’s make sure we’re all on the same page and review the concept of an UPSERT (or MERGE, in Transact-SQL). A simple, human definition from Wiktionary:
"To insert rows into a database table if they do not already exist, or update them if they do."
Or, for those of us who prefer a programmatic, pragmatic definition of how standard SQL implements this:
MERGE INTO tablename USING table_reference ON (condition)
WHEN MATCHED THEN
UPDATE SET column1 = value1 [, column2 = value2 ...]
WHEN NOT MATCHED THEN
INSERT (column1 [, column2 ...]) VALUES (value1 [, value2 ...]);
For the sake of completeness: a key component of the SQL statement here is the ON clause, which determines which keys are used to determine whether a “row” exists or if it should be considered as new. In our example case above, this might be the combination of the Timestamp and Dimension columns.
That sounds like it is exactly what we need in this case! Effectively, an UPSERT or MERGE statement on our example, if implemented in SQL, would look roughly like this:
MERGE INTO target USING source ON (source.timestamp = target.timestamp AND source.dimension = target.dimension)
WHEN MATCHED THEN
UPDATE SET target.value = source.value
WHEN NOT MATCHED THEN
INSERT (timestamp, dimension, value) VALUES (source.timestamp, source.dimension, source.value);
The same would naturally also still work to insert new data, given that no match would be found based on the Timestamp and Dimension columns when a wholly new row is found.
Now that is all fine, but the problem remains the same: Tableau Prep does not know the concept of UPSERTing data or performing a MERGE. It turns out there is a simple workaround we can use to realize this after all. Read on, the secret is soon to be revealed…
UPSERTing Data... With Tableau Prep
When applying our strategy to UPSERT data with Prep, we will step away from using the Incremental Refresh feature in the first place.
Why?
Well, that is quite simple: we need to read “old” data as well, to ensure that we can verify whether it was modified and that it needs to be updated in our target table!
This boils down to either reading all data from our source in the input step, if the dataset is small enough, or reading relatively recent data if we’re dealing with larger volumes.
In our case of the Slack messages, we decided to always read the last 14 days’ worth of messages, UPSERTing these. We’re effectively assuming that it is very unlikely that a message gets edited if it is older than 14 days.
Now here comes the whole point of the post. While it is not possible to have Tableau Prep issue an UPSERT statement as an output step of a Flow, an output step does support running Custom SQL after the execution of the output step.
Given that that Custom SQL can be a MERGE or UPSERT statement, we just need to make sure that we have our data at hand to pass it to that UPSERT statement.
The easiest way to do that is nothing more than to write it to a temporary table, which we will use in our UPSERT statement. In other words, when applying this to our example, we will:
- First write (all) the data of our applicable time range to a temporary table.
- Then trigger the UPSERT statement as Custom SQL after the transfer of the data.
Here’s what that looks like if we have both new and modified data:
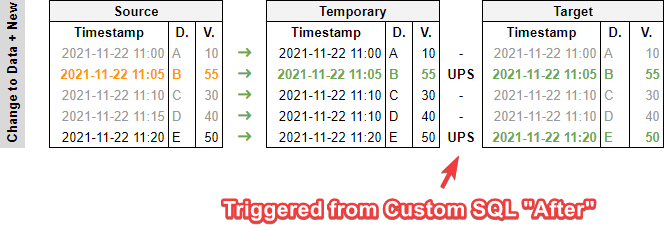
The statement used for the UPSERT or MERGE in Prep’s Custom SQL field is exactly the one specified above, except it specifies the temporary table as a source, rather than the original source table.
To clarify just slightly more, here is what that looks like “in full” when applied in Tableau Prep. You might see a few more columns than listed in the example screenshots above, but the gist is the same.
The flow, high-level:

Woah, umh... Pretty simple, right? In this case, do note that the input node would typically contain logic to pull recent, relevant data; e.g., think of the 14 days we described earlier during which our Slack messages can still be updated.
It might use Custom SQL for the input along these lines, for example (in SQL Server-like flavour):
SELECT * FROM messages WHERE timestamp >= DATEADD(day, -14, GETDATE())
Next, let’s review the Output step, which is where most of the magic happens. First, the “Settings” tab which directs Prep’s output:

And finally, the “Custom SQL” tab, “After”:
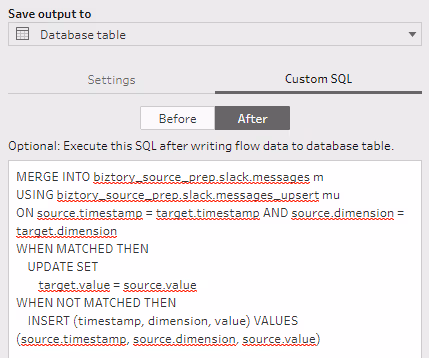
That’s it! That’s more or less the same as the query above.
Conclusion
While Prep does not have native functionality for allowing write-back UPSERTs or MERGEs yet, it definitely contains the tools that enable the functionality.
By working with a temporary table and then using Custom SQL to trigger a MERGE from the temporary table to the final target table, we’re able to emulate this behaviour after all.